Exposure Plans
Each target has one or more associated Exposure Plans that describe the actual exposures to be taken. An Exposure Plan only has a few properties - but it references an Exposure Template that provides many more.
Basic Operations
Exposure Plan Creation
New Exposure Plans are added by navigating to the desired target, entering Edit mode, and clicking the Add exposure plan icon. A new exposure plan is initialized with default values and always references the first Exposure Template for the applicable profile.
If you have not yet created any Exposure Templates for this profile, you will be warned and will have to create at least one before proceeding.
Copy/Paste
When the target is not in Edit mode, you can copy all Exposure Plans for a target and then paste them to the same or different target. This is especially useful when you have imported the targets for a mosaic: create the Exposure Plans for one target then copy and paste to all of the others.
If you copy Exposure Plans from a target under one profile and then paste to a target under a different one, you will be notified that the referenced Exposure Templates have been reset to the default for the profile and you will have to edit them.
If the copied Exposure Plans had an override exposure ordering, that order will also be copied - but only if the destination target is in the same NINA Profile as the source target and has no Exposure Plans of its own when the paste is started.
Manual Grading
When delayed grading is enabled it may take some time before grading is triggered automatically. In this case, you can manually trigger grading on all pending exposures for all exposure plans. Grading happens in the background; you can refresh to see the latest status.
Note that if you do manually grade, you will be limiting the population of images used and risk grading on an unrepresentative sample of a larger population.
Delete All Exposure Plans
When the target is not in Edit mode, and you have at least one Exposure Plan, you can delete all exposure plans with a single click.
Exposure Plan Editing
Exposure plan fields are edited in line in the same table used for viewing them. Simply double-click a field and make your change. You will have to tab-out of the field to enable the Save icon.
When done, click the Save icon for the Target to save your changes or the Cancel icon to cancel.
Exposure Plan Enable/Disable
When the target is not in Edit mode, you can enable/disable exposure plans by clicking the on/off button. The action is immediate.
You can continue to edit a disabled exposure plan. However, it will not be considered by the planner - either for previews or live operation. If all exposures plans are disabled, or the only enabled plans are completed, then the target will be treated as inactive.
Exposure Plan Deletion
When the target is not in Edit mode, you can delete exposure plans by clicking the Delete icon.
Exposure Plan Properties
| Property | Type | Description |
|---|---|---|
| Template | dropdown | Exposure Template to use for this plan. |
| Exposure | double | Exposure time in seconds. Leave blank to use the default defined for the template. |
| Desired | integer | Number of desired images for this plan - see below. |
| Accepted | integer | Number of accepted images for this plan - see below. |
| Acquired | integer | Total number of images acquired for this plan. Read only - see below. |
| Percent Complete | percentage | How close the plan is to complete. Read only - see below. |
| Percent Complete* | percentage | Provisional percent complete. Read only - see below. |
Number of Images / Percent Complete
As part of an exposure plan, you set the total number of images you Desire for the plan. The plugin will continue to schedule exposures for this plan as long as the Percent Complete is less than 100%. The Percent Complete calculation depends on whether image grading is enabled for the corresponding project:
Image Grading Enabled
When image grading is enabled on the project (the default), the Accepted count in the exposure plan is automatically incremented for each image that passes grading. In this case, percent complete is simply the Accepted/Desired ratio.
Even though the Accepted count is managed automatically when grading, you are still free to edit it up/down as needed. You are always encouraged to examine your images in your favorite post-processing tool since grading there is likely to be much more sophisticated than the built-in image grader.
Image Grading Disabled
When image grading is disabled, then Accepted is not incremented automatically and isn’t a factor in determining Percent Complete. In this case the Exposure Throttle preference is used and completeness is Acquired / (ExposureThrottle * Desired).
The Acquired count is always incremented for each exposure and cannot be edited.
Provisional Percent Complete
The state of acquisition and grading for an exposure plan determines whether the regular percent complete (Accepted/Desired) or a provisional percent complete (Acquired/Desired) is used:
- If grading is off, delayed grading is off, or delayed grading is on and has triggered, then regular percent complete is used.
- Otherwise, provisional percent complete is used.
Provisional percent complete provides a clearer picture of plan progress when delayed grading has not yet triggered.
Exposure Order
The Exposure Order display shows the ordering of exposures and dither operations by the planner. The ordering can be the default (automatic) or manually overridden. Click the gear icon to create an override. Once you have an override, you can remove it by clicking the cancel icon when it is shown.
Default Ordering
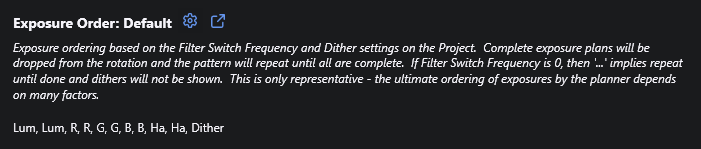
By default, exposure order is automatically determined based on the set of exposure plans plus the Filter Switch Frequency, Dither After Every, and Smart Exposure Selection settings on the associated Project. The displayed order shown is merely representative and has some limitations:
- If Filter Switch Frequency is zero (repeat each plan until complete), it just shows ‘…’ after each and dithers will not be shown.
- Each plan will be shown regardless of whether it is complete or not.
- Other factors could impact how exposures are planned - for example the twilight level of the associated Exposure Templates.
None of these limitations impacts how the actual exposure planner works.
Override Ordering

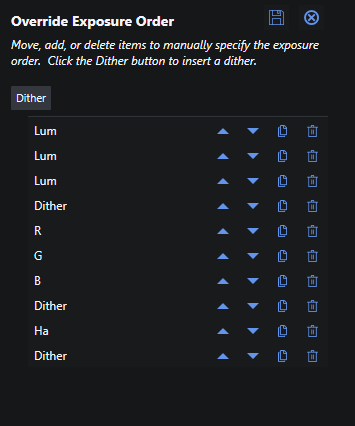
If the automatic exposure ordering doesn’t meet your needs, you can override it and specify your own. When you click the gear icon it will open a popup where you can create or edit an override exposure order. It starts with a simple list of the current Exposure Plans for the target. You can then duplicate them, move them up/down, or delete them. You can also insert a Dither by clicking the Dither button. This will add the Dither either after the selected row or at the end if none is selected.
When done, click Save to save or cancel to cancel.
It’s important to understand the following when overriding Exposure Order:
- You are responsible for ensuring that the ordering makes sense. In particular, if you delete the last instance of an Exposure Plan in the override list, then that plan would never get scheduled. You would have to cancel the override and then recreate it.
- If you add or delete Exposure plans, then the override list is reset back to the default order. There is no warning before this takes place.
- If you change the Exposure Template for a plan, that plan will be updated to the new template name in the override list.
- An override order will be copied when exposure plans are pasted. This will happen when exposures plans are pasted, when a target is pasted, or during a bulk import when the template target has an override order.
- Be aware that you’re likely to over-dither as exposure plans reach completion or are rejected for moon avoidance. The dithers are fixed in the order and the fact that exposures prior to that are dropped doesn’t stop inclusion of the dither.